


Manicures: A DIY Project
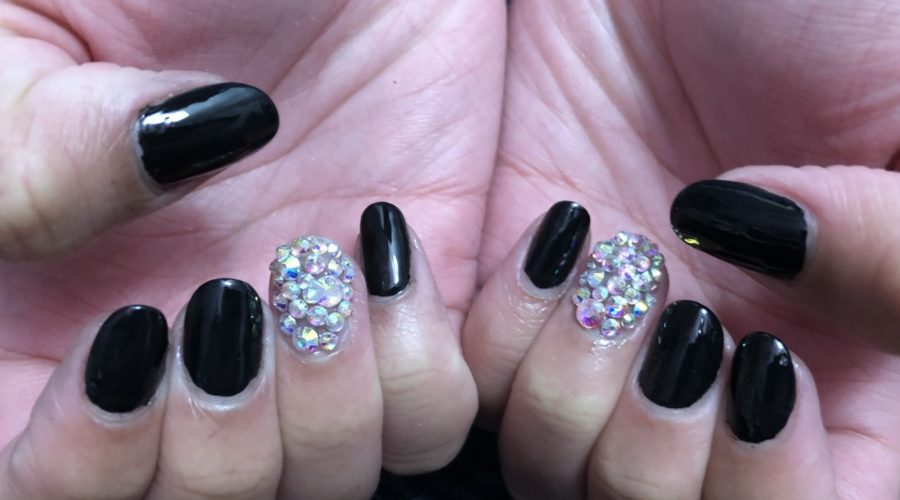
Since the pandemic, many of us have been doing things at home. One of those things is at-home manicures. While salons have reopened, some may now prefer the therapeutic experience of giving oneself a manicures at home instead of masking up and spending an absurd amount of money. At-home manicures are not as hard as you may think. You do not have to have the steadiest hands or be an artist to do it. Just make sure you follow the right steps, be patient, trust the process AND DO EVERYTHING SAFELY! Here are some great tips and information to achieve the look of a salon manicure in the comfort of own home.
Base Coats: Why should I include them in my manicure routine?
Base coats help prevent nails from getting stained from polish. They also make for nicer, smoother polish application. *Note: If you are sensitive to nail polish in general, skip the base coat. It could lead to a potential allergic reaction due to its ingredients.
Topcoats: Will it make a difference if I skip it?
According to So Nailicious (sonailicious.com), topcoats can give you a salon manicure look and help your polish wear longer. Topcoats can help even out a messy polish application. Topcoats make the cheapest polish work. If there is one thing you should invest in, it is a good topcoat.
Keep it simple and learn how to do natural nails, not acrylics or gel manicures. When giving yourself a manicure on your natural nails, you need to make sure that you prep your nails just right for the polish. Before doing anything, make sure you work on a flat surface that you don’t care if it gets damaged. Just in case, cover the surface with a paper towel or an old cloth towel.
After finding a good place to do this, you are going to need to grab your supplies. Many of these supplies can be found at your local drugstore or dollar store, making the process much more affordable. You are going to need the following items: a nail file, a nail-buffing block, a cuticle pusher, nail polish remover (you can use a nourishing nail polish remover or pure acetone), a base coat, a topcoat, cuticle oil or a lotion, a bowl of warm water, a few paper towels, rubbing alcohol, a nail polish color of your choice, a nail clipper (if necessary), and cotton balls. That on its own sounds like a lot, but none of these items is hard to find. Be sure all of your supplies are clean; otherwise, use rubbing alcohol to clean them!
First, start by adding some nail polish remover to a cotton ball and remove all nail polish off your nail beds (still do this even if you have no polish on your nails to clean the nail bed).
Secondly, cut your nails if you need to. Cut your nails to your desired shape. Stick with square and round shapes because they are easy. When finished with this, grab your nail file and start filing your nails to your desired shape. TIP: When filing, file in one direction. Do not go back and forth; otherwise, you are adding unnecessary harshness to the nail.
Following the tips above, shape the nail so that there are no sharp or crooked edges for round nails. For a square nail shape, file the tip of your nail so that it is straight across. Feel free to round out the points of your square nail so they do not snag anything. TIP: Look at your nails from all different angles and make sure they all look the same from every angle. Be careful when filing because you can lose more of your nail than you intend to, making them shorter unintentionally.
After filing to your desired nail shape, take your square buffing block and gently buff the edges of your nail to get rid of all the mess from filing. After filing and buffing your nails, get a bowl of warm water and rub some cuticle oil or a lotion of your choice around your cuticles and all over of your nail bed. After letting that sit for a second, dip your hand into the warm water for about 30 seconds. Then, grab your cuticle pusher and use the biggest side and GENTLY push back your cuticles and get rid of any unwanted debris on your nails. Do not overdo this step as it can destroy your nail bed. If you are not comfortable getting rid of the extra debris on your nails, then just push back your cuticles. If you would like to gently buff the surface of your nail bed to smooth it out, you can do that to. TIP: DON’T do this often, it’s not good for your nails if you do it repeatedly over time! Repeat the process on the next hand.
Now do a quick cleanup of your nail station (discard of used cotton balls, put the rest of the cotton balls away, disinfect nail clipper and cuticle pusher with soap and water or rubbing alcohol, loosen up the nail polish bottles so they are not difficult to open in between coats of polish, put away nail file and buff, and wipe your surface down with a wipe). Next, WASH YOUR HANDS! Get rid of the nail dust, excess oils, and try and get rid of any dirt under your nails (this will make your nails look neater and cleaner, especially when using a lighter color). If you would like to, you can also use a body scrub to really exfoliate your hands, and then use a drop of dish soap as a final rinse. If not, rinse your hands with some warm water and dish soap. Now that you have dried your hands (bring some paper towels with you to your workstation if you didn’t bring them already) and cleared up your workspace, you are ALMOST ready to paint. Take a small piece of the paper towel and put some rubbing alcohol on it. If you want to use the nail polish remover you have been using, that’s fine too. Wipe your nails individually with the paper towel, and do not touch your nails after this.
Finally, it is now time for the polishing process! TIP: When using any kind of polish (colored, base coat, topcoat), wipe off the excess product on the inside of the bottle so you don’t flood your cuticle with polish. When painting with any sort of polish, start a little above your cuticle and swipe up with the brush; give yourself full control over the brush, and let the brush curve with the sides of your nails.
Let’s get to polishing! First, take your basecoat and paint a thin layer of it, then wait two minutes for it to dry. Then, take your nail polish and paint all of your nails. Wait another two minutes before doing a second coat for extra opaqueness. On the second coat, do the same thing, but make sure you have a little bit more polish than you started with, and take the brush and wipe it against the tip of your nails so you seal the nail completely. After the second coat, wait 15 minutes before adding your topcoat (seal the edge of your nail with the topcoat like you did with the second coat of nail polish). Note: When you add the topcoat, make sure you have a good amount on the brush, so the brush doesn’t touch your nail and ruin the underlying polish. After this, let your nails dry; do not touch anything or clean up your station before drying them for about two hours. If you would like to apply a little bit of moisturizer carefully when your nails are touch dry, go ahead. When you come back later, make sure to wipe the surface you did your nails on with a good household cleaner to remove the chemicals from the surface of your supplies.
DO NOT do your nails when you are in a rush! DO NOT do your nails before bed because the polish can be dented if your nails make too much contact with the bed sheets. DO NOT do your nails and then go and shower! And, DO NOT use anything other than a quick-drying topcoat or small fan to speed up the nail-drying process!
How to Clean up Your Nails
If you really want that salon-done touch, invest in an angled eye liner brush. It’s great for cleaning up the edges. You can find a cheap one at the drugstore. Take that brush and dip it into some acetone or nail polish remover, and blot it on a paper towel so that the excess product doesn’t ruin the manicure. Wipe the edges and near the cuticle area if necessary (If you’re scared, DON’T RISK IT). Do this before your topcoat. Let your topcoat be the FINAL step to seal in perfection. If there is still more polish on your fingers, don’t pick it off; let it fall off on its own in the shower or in bed; otherwise, you could risk peeling the polish off on the nail and ruining the tip of the nail. Another tip is following all the steps above but leaving your thumbs out when painting. Then, you can use your thumb nails to clean the edges of each nail during the painting process. Without ruining the rest of your nails, use polish remover to clean your thumbs and do the previous steps on your thumbs. If it gets messy, use the cleanup brush technique.
Oh no! I ruined by polish! How do I fix it?
- Tap the nail gently and add a layer of topcoat.
- Tap the nail gently, add another layer of polish (let that dry for five mins) and then add another layer of topcoat.
- Re-do the whole nail: If you’re scared of ruing the rest of your nails with nail polish remover, dip a cotton swab in some nail polish remover and clean off your nail with the cotton swab and re-polish. If you don’t use a cotton swab to clean off the polish, use a paper towel because the fuzzies from the cotton ball will get all over the nail bed.
Is there Anything Else?
Yes, moisturize your hands, cuticles, and nails with a thick and heavy moisturizer. After all that work on your nails and hands, they must be dry! Feel free to add another layer of topcoat after a few days to maintain that shine.
How Can I Grow My Nails?
- Avoid doing any crazy work with your hands and nails if you can.
- Use gloves when washing dishes because the water isn’t good for your manicure or nail beds.
- Add some cuticle oil around and on your nails and cuticles before bed and after washing your hands.
- Rub garlic on your nails as often as possible: According to Bold Sky: Limitless Living’s website (boldsky.com), a mineral that goes by the name selenium is in garlic, which helps strengthen nails. What I do is chop up some peeled garlic and rub it all over my nail beds.
- Don’t cut your nails.
- Don’t bite your nails!
- If your nail is peeling, seal it with a thick layer of clear polish (DON’T PICK AT IT OR PEEL IT).
- Even if your nails are square, round the points so they don’t snag things and break.
- If your nail is peeling badly and the clear coat doesn’t help, gently file and buff it and go over it with a clear coat again.
- Don’t press buttons with your fingers if you have long nails; use your knuckles.
- Use a spoon to open soda cans, NOT YOUR NAILS!
- Wear nail polish.
Even though this process seems long, if you follow each step properly and don’t it, you can achieve a salon-done manicure at home. Eventually with practice, you can do other kinds of nail designs. The best part is that by the time you are finished, you will be happy with the result and proud of what you have accomplished. In addition, you will certainly save yourself some money!
Hi, I'm Alexis. I'm from the Class of 2024, and I am the assistant editor of Horizon's online features section. I love snacking while doing homework as...